
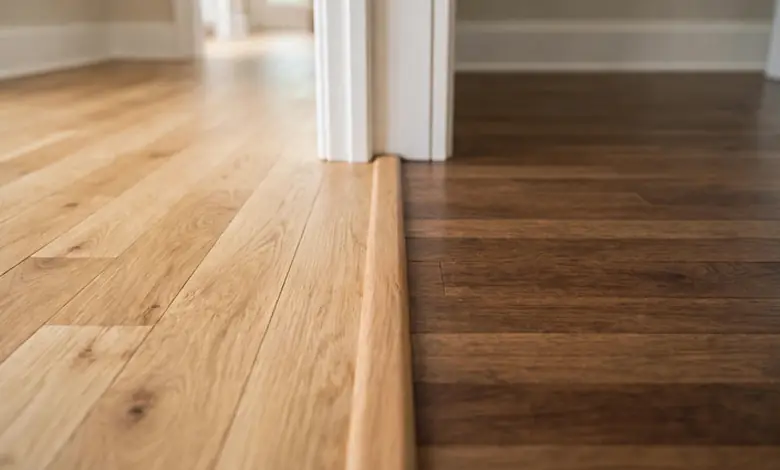
Walk through most homes with hard floors and you will cross a T molding without noticing it. That is the point. It is the narrow strip, shaped like a T in cross-section, that sits where two floors meet: between a hallway and a bedroom, at a doorway, or where one room’s flooring changes to another’s. When it is fitted well, your foot glides over it and your eye barely registers it. When it is missing, fitted badly, or chosen wrong, you feel the edge, see a gap, or catch a toe on a raised lip.
A T molding transition is not a decorative extra. It covers the small expansion gap that hard floors need, protects the exposed edges of two floors, and creates a smooth bridge between them. It also allows for a tiny amount of movement, because wood and laminate floors expand and contract slightly with changes in temperature and humidity. Without a cover over that gap, edges can chip, dirt collects in the joint, and the join looks unfinished.
This guide explains what a T molding is, when you actually need one, how to choose the right material and finish, how to measure and plan the job, and how to install it so it sits flat and stays put. It also covers the mistakes that cause most problems, and how to look after the strip once it is in place. You do not need to be a professional floor fitter to understand it, and for a straightforward doorway, many confident DIYers can fit one themselves with basic tools. If the floors are uneven, damaged, or the subfloor needs work, though, that is a different job, and it is worth getting advice before you start.
Contents:
- What a T Molding Actually Is
- When You Need a T Molding Transition
- Types and Materials Compared
- Measuring and Planning Before You Buy
- How to Install a T Molding Step by Step
- Common Mistakes and How to Avoid Them
- Looking After Your Transition Strips
- Frequently Asked Questions
- Conclusion
What a T Molding Actually Is
Fun fact: The “T” in T molding comes from its shape in cross-section: a flat top bar with a central stem underneath that fits into a track or gap between the floors.
A T molding has two parts. The top is a flat, slightly rounded bar, wide enough to cover the gap between two floors and overlap the edge of each one by a small amount. Underneath, in the middle, is a stem that drops down into the gap. In many systems, that stem clicks or slides into a metal or plastic track that is fixed to the subfloor first. In simpler glue-down versions, the stem is fixed directly with adhesive. Either way, the shape does the same job: it bridges two surfaces, hides the joint, and gives you a smooth surface to walk over.
When You Need a T Molding Transition
You need a T molding whenever two hard floors meet at about the same height and there is a gap between them that needs covering. The most common place is a doorway. When flooring runs from a hallway into a bedroom, installers usually leave a small expansion gap at the doorway, rather than running the flooring continuously through, because long continuous runs need room to expand. A T molding covers that gap neatly and marks the change from one room to the next.
The bottom line: If two hard floors meet at the same height with a gap between them, a T molding is almost certainly the right strip. If the heights are noticeably different, you need a reducer instead, and if one side meets carpet or a vertical edge, you need a different profile altogether. Choosing the right profile for the situation is half the job.
Types and Materials Compared
T moldings come in several materials, and the best choice usually depends on the floors on either side, the look you want, and how much wear the doorway will get. Solid wood moldings can be stained to match a wood floor closely, and they can be sanded and refinished along with the floor in some cases. They look natural and feel solid underfoot, but they can be more expensive, and they need the same kind of care as a wood floor, including protection from standing water.
Wood-veneer and laminate moldings are made to match specific flooring ranges. A veneer molding has a thin layer of real wood over a core, while a laminate molding has a printed surface that mimics wood, stone, or another finish. Both are popular because they match the floor well and are usually easier to find in the exact color of your flooring. They are generally less expensive than solid wood, but a deep scratch can be harder to repair, because the surface layer is thin.
Vinyl and PVC moldings are flexible, water-resistant, and practical for kitchens, bathrooms, utility rooms, and other areas where moisture is a concern. They are often lighter in weight and easier to cut, and they come in a wide range of finishes that imitate wood or stone. They may not feel as solid as wood underfoot, and very cheap versions can look less convincing up close, but for a busy, moisture-prone doorway they are a sensible, low-maintenance choice.
Metal moldings, usually aluminium, are strong, slim, and modern-looking. They suit contemporary interiors, commercial spaces, and doorways that get heavy foot traffic, including wheeled traffic. They do not match a wood floor as closely as a wood molding does, but in a modern home that contrast can look intentional. Metal strips are also useful where a very low profile is needed, though they can feel cold and hard under bare feet, and they can dent if something heavy is dropped on them.
Table:
| Material | Best for | Strengths | Watch out for |
|---|---|---|---|
| Solid wood | Matching wood floors, period homes | Natural look, can be refinished | Higher cost, needs protection from water |
| Wood veneer / laminate | Matching a specific flooring range | Good color match, mid-range cost | Thin surface, hard to repair deep scratches |
| Vinyl / PVC | Kitchens, bathrooms, moisture-prone areas | Water-resistant, easy to cut, low maintenance | Can look less solid, quality varies |
| Metal (aluminium) | Modern interiors, heavy traffic | Strong, slim, durable | Cold underfoot, can dent, less warm in appearance |
Measuring and Planning Before You Buy
Good measuring takes a few minutes and prevents the most common frustration: buying a strip that is too short, or discovering mid-installation that the floors are not level. Start by measuring the width of the opening where the strip will go, from one side to the other, including any door frame it needs to sit under or alongside. T moldings are commonly sold in lengths that cover a standard doorway, but wider openings, double doors, and open-plan breaks may need a longer strip or two strips joined carefully. Measure twice, and allow a small amount for trimming, rather than cutting exactly to the opening on the first try.
How to Install a T Molding Step by Step
Installation varies slightly by system, so always follow the instructions for the specific molding and track you have bought. The general process, however, is similar for most track-based systems, which are the most common for laminate and engineered wood floors. First, make sure the area is clean and dry. Sweep or vacuum the gap and the edges of both floors, and remove any debris, old adhesive, or loose pieces that could stop the track sitting flat. A clean surface helps the track fix firmly and stops the finished strip from rocking.
Next, fit the track. The track is usually a narrow metal or plastic channel that screws or sticks to the subfloor in the gap between the floors. Position it centrally, so the top bar will overlap both floors evenly, and fix it according to its instructions. Some tracks are screwed down, which gives a firm fixing and allows the strip to be replaced later. Others are glued, which is simpler but harder to remove. Whichever type you have, make sure the track is level and does not sit proud of the floor surface, because a raised track will lift the finished strip.
Then cut the molding to length. Measure the opening again, mark the strip, and cut it with a fine-toothed saw for wood or laminate, or a suitable cutting tool for vinyl or metal, following the manufacturer’s guidance. Cut slowly and steadily to avoid chipping the surface, and test the fit in the opening before fixing it. The strip should sit snugly from one side to the other without needing to be forced in, and it should not be so short that it leaves a visible gap at either end. If the ends will sit against a door frame, a neat, square cut matters more than speed.
Now fit the strip into the track. In many systems, the stem presses or taps gently into the track with a rubber mallet, working along the length of the strip rather than hammering one spot. Do not use excessive force, because that can crack the strip, damage the track, or lift the edges of the floors. Once it is in, step on it gently along its length and check that it sits flat, does not rock, and does not lift at either end. Check the door swings clear, and check the join from both sides in normal light. A well-fitted strip should look like it belongs there, not like an addition.
Common Mistakes and How to Avoid Them
The most common mistake is choosing a T molding for floors at different heights. The strip will sit tilted, one edge will stick up, and it will feel uncomfortable underfoot and look unfinished. Measure the heights first, as described above, and use a reducer if there is a real step between the floors. A related mistake is using a T molding where a floor meets carpet. Carpet needs its own edge treatment, and a T molding will not grip or finish carpet properly, so the edge will fray and lift over time.
Another frequent problem is cutting the strip too short. A gap at one end, even a small one, draws the eye and collects dirt. Measure the full opening, including the parts hidden by door frames if the strip runs underneath them, and cut with a small margin you can trim, rather than cutting short and hoping it will stretch. Similarly, fitting a strip over a dirty or uneven gap causes rocking. Clean the gap, check for raised edges or debris, and fix the track level before you fit the strip itself. Rushing this preparation is the fastest way to a strip that needs refitting.
Looking After Your Transition Strips
Looking after a T molding is mostly about normal floor care, with a little extra attention to the joint. Sweep or vacuum regularly, because grit trapped along the edges of a strip can scratch both the strip and the floors beside it. When mopping, wring out the mop well, especially for wood and laminate strips, and avoid leaving standing water along the joint. Water that sits in a gap can swell wood edges and weaken adhesive, even if the strip itself is water-resistant.
Check the strip occasionally by stepping on it along its length. If it starts to rock, lift, or feel loose, it is better to investigate early, when the fix may be as simple as reseating it in its track or replacing a damaged section, than to leave it until it becomes a trip hazard or damages the floor edges. Also check for chips or dents after moving furniture, because dragging heavy items across a doorway is a common cause of damage. Lift furniture, or use protective pads, when moving it over a transition. For more home improvement ideas, adapt the practical tips that suit your own home.
Frequently Asked Questions
What is a T molding transition used for?
A T molding transition joins two hard floors that are at roughly the same height, covering the expansion gap between them and protecting both floor edges. It is most often used at doorways and where two different hard floors meet.
Can you use a T molding between laminate and tile?
It depends on the heights. If the laminate and tile finish at about the same height, a T molding can work, but tile is often higher than laminate once adhesive and thickness are included. If there is a noticeable step, a reducer is usually the better choice.
Do T moldings need to be glued down?
Not always. Many T moldings fit into a track that is fixed to the subfloor, and the strip itself clicks or presses into that track without being glued to the floors. Glue-down versions exist too, so follow the instructions for the specific product you have bought.
How wide should a T molding be?
It should be wide enough to cover the gap between the two floors and overlap each floor by a small amount on both sides. Measure the gap and the opening before buying, and compare the strip’s top-bar width with the gap it needs to cover.
Can I install a T molding myself?
For a straightforward, level doorway with a track system, many confident DIYers can fit one with basic tools. If the floors are uneven, the subfloor needs repair, or you are unsure which profile you need, get professional advice before starting.
Conclusion
A T molding transition is a small piece with an important job: it lets two floors meet cleanly, safely, and without fuss. Choose the right profile for floors at the same height, pick a material and finish that suits the rooms on either side, measure the opening, the heights, and the gap before you buy, and fit the strip carefully into a level track or with the correct adhesive. Avoid the common traps of mismatched heights, short cuts, and rushed preparation, and the result will be a join you barely notice, which is exactly what a good transition should be.
The bottom line: Get the profile, the measurements, and the finish right, and a T molding will do its job quietly for years. It protects your floor edges, covers the gap that floors need to move, and turns a doorway from an unfinished joint into a finished part of your home.
Read Also: Red T Shirt Women (2026 Guide) and Everyday Styling Tips




One Comment